089: Silent Hill f Part 1, or Silent Hill But We're in Japan Now
Welcome back to our annual visit to Silent Hill! This time is a little different, as we won’t technically be visiting the town. But the town is a state of mind, so it’s okay. If you’d like to revisit any of our previous vacations, you’ll find them in the list below:
007: The Worst Vacation or That Time SoraRabbit Played Silent Hill 2 Yet Again
029: Silent Hill Shattered Memories, or Harry Runs Away Repeatedly
047: Harry's Bad Trip, or SoraRabbit Plays More Silent Hill
058: Heather Visits Her Hometown, or Silent Hill Time Again!
068: The Staycation From Hell, or SoraRabbit Revisits Silent Hill
079: A Brief Visit To Silent Hill
081: Revisited, Remade, Reborn, or SoraRabbit Plays Silent Hill 2 AGAIN
Attentive readers may have noticed that this is the first time I’ve labelled one of my Silent Hill posts as “Part 1”. There’s a reason for that, which I will get into later. But don’t worry, this post is complete in itself.
Years ago, when the Silent Hill 2 Remake was announced, they also announced another game called Silent Hill f. We got a brief teaser trailer and very little information about it. I was excited about it anyway, liking the concept and setting, so I’ve been waiting for it all this time. After a long wait, the game was finally released and we can cover it now. It came out in late September, so I started my annual Silent Hill playthrough a couple of weeks early and had time to get through the game three times. I won’t leave you all in suspense… I loved this game and had a lot of fun playing through it for this post. Cocoa played spectator for much of my first playthrough and all of my third, even helping me with some of the puzzles.
Anyway, enough setup. There’s a lot to cover, so let’s get going!

Title screen. (Credit: NeoBards Entertainment, Konami)
Silent Hill f was released in 2025 by Konami and developed by NeoBards Entertainment for PlayStation 5, Windows, and Xbox Series X/S. It was written by Ryukishi07, who is known for his visual novels. I played the PS5 version for this post.
As mentioned, this game does not take place in the usual American town of Silent Hill, but rather the fictional rural Japanese town of Ebisugaoka in the 1960s. The game can be played with Japanese vocals and English subtitles, or with English voicework. (Obviously, I played it in Japanese with subtitles.)

Warning. (Credit: NeoBards Entertainment, Konami)
Since this is a Silent Hill game, we will be covering some dark subject matter and there may be some upsetting screenshots below. Please use caution before proceeding with this post so as not to cause unnecessary anxiety or discomfort to yourself. This game contains references to child abuse, gender discrimination, bullying, mental disorders, alcohol and drug abuse, torture, and murder.

Another warning. (Credit: NeoBards Entertainment, Konami)
Also, as always, spoilers follow for the plot and one of the endings. If you intend on experiencing this game for yourself and don’t want the twists and ending spoiled, please return later to read further.

Item wheels. (Credit: NeoBards Entertainment, Konami)
There are a lot of new mechanics in this game. For one thing, you have three status meters. The red one is for health. The green one is for stamina, which is reduced while taking actions in battle. The white flowers above the other gauges is your sanity meter. This reduces while in combat or during a chase. It’s also consumed while using Focus. More on that later. The sanity meter can be considered a type of “armor” in the game. Enemies can inflict psychological attacks. Touching the red flowers or in parts of the game with a red mist, sanity is quickly depleted. If you’re damaged by anything listed here with your sanity meter depleted, it takes health instead. There is also a Focus meter, but that only shows up while using Focus.

Omamori list. (Credit: NeoBards Entertainment, Konami)
Another new mechanic is the ability to equip Omamori. Omamori are a very important item in the game. You can equip one of your choice when you start and these are found around the map or in the Shrines. (We talk about that next section.) These are charms that grant you various stat increases and positive effects such as increased health, improved dodging, reducing enemy sightlines, and many more. While you can only equip one at the start, this total can be increased. The limit for number of Omamori you can equip at once is three in Story Mode, but this can be increased further in New Game+. There are a total of 41 Omamori throughout the game.
There is also an item called the Blessed Hand Mirror. This is equipped like an Omamori, taking up one slot. If you take damage exceeding your health, the mirror fully restores your health, stamina, and sanity and then breaks. You can only carry one Hand Mirror at a time. When one’s in your inventory, another one won’t show up.

A Hokora Shrine. (Credit: NeoBards Entertainment, Konami)
The game autosaves at specific spots, but you also need to save your game to have a proper save file. This is done at Hokora Shrines, which are set all around the game at various locations. There is more to do at these Shrines than just save. You can Enshrine items that are labelled as offerings, which is the only way to earn Faith. This is a currency you can use to improve your character. You can spend Faith to draw a random Omamori. You can also claim preorder bonuses if available, and change your costume. In Story difficulty, the Shrines automatically restore your health and sanity. (Health does not go to max, however.) In harder difficulties, you have to select Clear Mind and pay a small amount of Faith to recover sanity. Health will not restore without the use of items or Omamori in those difficulties.

Upgrades. (Credit: NeoBards Entertainment, Konami)
The other option you can do at the Shrine is Pray. If you have an item called an ema (a wooden prayer plaque) and a set amount of Faith, you can upgrade your health, stamina, sanity, or Omamori slots. Yes, this Silent Hill game has upgradable stats! Once upgraded, the max gain is permanent and the next upgrade costs another ema and a steep increase in Faith.

Costume selection. (Credit: NeoBards Entertainment, Konami)
The default costume is the navy school uniform. For preordering the game, you were given the white school uniform. This is the only way to access this costume. For purchasing the Deluxe preorder or the Deluxe Upgrade, you get the pink rabbit costume. The costumes are only cosmetic and do not effect gameplay. You will see the costumes change between white and navy in my screenshots, because I wore the default navy for my first playthrough and was so caught up in the game that I didn’t take as much screenshot footage as I should have been doing. For New Game+, I switched to the white costume. My later playthroughs will be in the bunny costume, obviously.
I did not, at first, buy the Deluxe Edition. But after playing it for a few days, I decided to pull the trigger on the upgrade. The other content included with this was a digital art book and the soundtrack, both of which are great. I listened to the soundtrack on loop while editing this post.

Item screen. (Credit: NeoBards Entertainment, Konami)
There are various helpful items in the game to restore your health, sanity, weapon durability, and to use as offerings. Some of the offerings can also be used to restore health, sanity, and stamina. To use an item you have to equip it to one of two item wheels that are brought up with a button press. (Strangely enough, you can only use items through the item wheel, not in the start menu.)
Returning from Silent Hill 4 is the concept of inventory space. You begin the game with 8 slots. Some items stack, such as the red capsules and bandages. The number at which they stack varies. Bandages stack in groups of three. When you get a fourth, it will take up another inventory slot. First aid kits take up one slot each. As you can imagine, these fill up really fast, especially with each different type of offering taking up a slot. If you try to pick up an item and you’re at your limit, you have to either leave the new item behind to pick it up later, or permanently discard a selected item. Luckily there are inventory upgrades available as you explore. Four can be found in the first playthrough and two in New Game+. Each add one inventory slot for a total of 14.
The Collectibles menu contains documents you have found and key items used for puzzles and for advancing the story.

Doll enemy. (Credit: NeoBards Entertainment, Konami)
What would a Silent Hill game be without combat? There are various weapons to protect yourself with. However, as with Silent Hill 4, the weapons are breakable. Only some of the weapons could break in Part 4, but most of them can in this game. The weapons have a durability meter, which can be restored using a toolkit. This restores its durability, but only to a certain point. If a weapon breaks, it is lost and you automatically switch to the next weapon in your inventory. If you try to pick up a weapon and you already have three, you can either leave it behind or permanently discard a selected weapon. The weapons have their own inventory space and you are limited to three at a time. (You can find the Otter Omamori, which restores the durability on your spare weapons as you kill monsters. That thing was a lifesaver on my second playthrough.)
In the Dark Shrine, the weapons are unbreakable, but they can only be used in those areas. The lantern in this area is equipped as a weapon, although you can’t attack with it.

Combat system. (Credit: NeoBards Entertainment, Konami)
The combat system is vastly different from the previous Silent Hill games, but it has the most in common with Silent Hill 2 Remake. You have light and heavy attacks. Heavy attacks are slower, but have the chance to stun the enemy. Some enemy attacks can be interrupted by a heavy attack. Making a heavy attack at the right time (when an enemy is flashing for a moment before they attack) is a counter, and deals a great amount of damage. (And usually stuns.) You can also do a Focus attack, which is done by filling your Focus meter with the L2 button and tapping the light attack button once it’s fully charged. Charging your focus consumes sanity. If you’re damaged while doing this, your max sanity decreases and will not recover over that level until you visit a Hokora.
But it’s not all offense. You can also dodge, and if you do this just before the enemy strikes, it’s a perfect dodge, which restores your stamina meter fully. Attacking, running, and dodging all take stamina and if you run out, you’re unable to act until it begins to recover. At times you can become winded, which delays your recovery. Some enemies can leap at you, and this damages you heavily if you don’t dodge out of the way in time.

The map. (Credit: NeoBards Entertainment, Konami)
Silent Hill games always have a robust map system and this game is no exception. While the map is a little difficult to parse when you start the game, it’s pretty handy once you get used to it. As always, when an area is impassable, you draw an X on it. If you can get through an area using a passage or a doorway, an arrow is drawn. Sometimes X’s are removed later in the game, so make sure to recheck places that once were dead ends. Hokora Shrines appear on the map in bright yellow, making it easy to see where you can access one. Your current objective is circled on the map, showing you where to go.

Another map. (Credit: NeoBards Entertainment, Konami)
Sketches are drawn on the map to show structures you can enter and the location of puzzles or landmarks. Question marks indicate when something can possibly be done in an area. If you have friends nearby, they can appear on the map as little faces.

Journal. (Credit: NeoBards Entertainment, Konami)
Another new addition to this game is the expanded journal system. Much of the story is in the journal and there is an on-screen indicator when new pages or entries are added. Sometimes these don’t show up, as with new additions for characters or monsters, so it pays to check the journal often.

I seriously hate this guy. (Credit: NeoBards Entertainment, Konami)
You can get more backstory and insights into the monsters and symbolism in the journal. Tutorial information and information on puzzles appear here too, making it easy to find clues. As you’re solving a puzzle, you can press a button to jump straight to the journal entry for that puzzle, which is really handy.

Spoooky. (Credit: NeoBards Entertainment, Konami)
You can set your difficulty level for both Action and Puzzle separately and they each have three levels. Story, Hard, and Lost in the Fog. The default settings the developers suggest for the first playthrough is Action: Story and Puzzle: Hard. Those are the settings I used on my first playthrough. The difficulties selected do not impact which ending you can attain. There are trophies available for winning the game on each of these six difficulties.
And with all that out of the way, let’s get to the story!

I don’t think the doll has a name. (Credit: NeoBards Entertainment, Konami)
As the story begins, the protagonist, Shimizu Hinako talks with her doll about how the girls don’t want to play with her because she plays with boys. This is framed as a flashback to when she was younger.

Hinako and Junko. (Credit: NeoBards Entertainment, Konami)
We see her older sister Junko, who always watches out for her. The scene pans about Ebisugaoka, a peaceful mountain village in the 60s.
You may be wondering, as I was, what exactly the “f” stands for in Silent Hill f. As far as I can tell, no one’s figured it out yet. So I’ll be trying to figure it out over the course of this post. Here’s my first attempt… just look at Junko’s kimono! Maybe the “f” is for “fancy”.

Time to explore the town. (Credit: NeoBards Entertainment, Konami)
After a fight with her parents, teenager Hinako leaves the house and descends the mountain path to visit her friends in the village proper. The town appears to be deserted. We first see her friend Sakuko through a window, cheerfully calling her a traitor. (This is not explained and starts you feeling that all is not right.)

Buncha kids hanging out. What could go wrong? (Credit: NeoBards Entertainment, Konami)
Outside the General Store, she meets up with her friend Shu first. Shu is the boy of the group and is Hinako’s childhood friend. They used to play a sci-fi game of make-believe together called Space Wars. He calls her his partner and they seem fully platonic. He also hands her a box of red capsules for her chronic migraines. (He’s studying to be a pharmacist) and references some decision Hinako needs to make. Their interaction is awkward, hinting at more not being said.
Soon after they’re joined by their other two friends. Sakuko, a shy spiritual girl. And Rinko, a more blunt and outspoken girl who has a not-so-secret crush on Shu and a growing jealousy of his closeness with Hinako. The four teens hang out for a bit, bantering.
I guess the “f” is for “friends”? No, too corny.

Oh, right. This is what could go wrong. (Credit: NeoBards Entertainment, Konami)
Suddenly, interrupting the fun, a mist rolls in and red flowers (red spider lilies to be exact) grow quickly through the street, engulfing Sakuko. They grow inside her, poking through the pores of her skin and killing her almost instantly. The kids scatter, getting separated.
Ohhh. The “f” is for “flowers”.

Runrunrun. (Credit: NeoBards Entertainment, Konami)
This triggers the first chase sequence of the game, where you have to navigate Hinako away from the flowers, first towards the camera and then through the winding alleyways of the town.
Maybe the “f” is for “flee”, since you do a lot of that in this game.

Wrong turn. (Credit: NeoBards Entertainment, Konami)
If you hit the flowers you’re damaged and stumble a bit. If you touch the flowers for too long, a tendril wraps around your leg and you die in the same way Sakuko bought it. I died a few times here on my first playthrough, getting turned around in the alleyways until I figured out the correct path.
After getting far enough away, the flowers stop chasing you and you’re near death. The game prompts you to take one of the red capsules Shu gave you, since this is your first healing item. (Keep in mind as we go that the game does everything it can to force you into taking the red capsules. I am just noting that so you can file that information away for later.)

Grapple attack. (Credit: NeoBards Entertainment, Konami)
Once you escape the flowers, you’re not safe however. Soon after, creepy animated mannequin-looking dolls attack you. They have knives and can leap at you, stabbing you. If you’re weak enough, this grapple attack can kill you. You get a metal pipe here, so you can either fight or run.
I guess the “f” could stand for “freaky”.

Hinako and her trusty pipe. (Credit: NeoBards Entertainment, Konami)
This next stretch of game is basically exploring the town and either fighting or evading enemies. During this part you can learn a bit more about what’s going on. A new doctor has entered Ebisugaoka, bringing modern medicine to the old-fashioned and spiritual villagers who are used to home remedies and prayer. The doctor appears to be missing and in various documents talks about a mysterious illness. The villagers worship a fox-deity named Inari-Sama (which can be defined as “great fox god”). Inari is a prankster and a vengeful god who punishes those who disrespect it. (Some documents refer to people dying after being filled with insects by the god.) But it protects the village and watches over its people. The deity is also said to spirit away young women to be its brides and they’re never seen again.
Anyway, during this part you can shimmy along narrow passages, duck under obstacles, climb onto ledges, and move aside obstacles to proceed. Finally making her way back to the General Store, she drags Sakuko’s body inside before fighting off a wave of monsters to protect her late friend.
Oh, and look at that badass girl with the pipe. The “f” clearly stands for “fierce”.

Oooh, a puzzle. (Credit: NeoBards Entertainment, Konami)
After defeating the monsters, Hinako collapses to the street with a headache and wakes up in a world referred to as the Dark Shrine. (This would be equivalent to the previous games’ Otherworld.) Here you are faced with your first puzzle, sorting offerings onto pillars on an altar. In Hard mode, it was all about matching the patterns found somewhere on the offering with the designs on the pillars. This isn’t too tough, it’s basically the tutorial puzzle.
Since we’re hanging out in a shrine now messing with altars and offerings, I wonder if the “f” is for “faith”.

Red mist. (Credit: NeoBards Entertainment, Konami)
After solving this, a red mist surrounds you, quickly depleting your sanity meter. You have to run from the room before you run out of sanity and it starts sapping your health. (This happens a few times the Dark Shrine segments.)

I’m sure we can trust the white-haired anime fox boy. (Credit: NeoBards Entertainment, Konami)
This is where you meet Fox Mask, a sinister yet charming fellow who guides you through the Dark Shrine. He gives you a lamp to help you navigate the dark area and tells you he set aside a key for you to open the door to the Shrine.
Oh, the “f” is for “fox”. Maybe?

Yes, follow the stranger to a second location. (Credit: NeoBards Entertainment, Konami)
Here you have to solve another puzzle, going along a winding path to three different areas filled with emas. (The wooden prayer plaques I mentioned in the upgrade section earlier.) Using a poem as a guide, you have to find unique pictures on the emas to solve a lock puzzle at the far end of the area to get the key.

He gots no face. (Credit: NeoBards Entertainment, Konami)
In one area of the Shrine you find an altar with the red-dressed doll from the beginning. (Hinako has no idea how the doll is here, since she threw it away when she got older.) She warns you to not trust the Fox Mask. You also get a small ceremonial knife, which serves as your unbreakable weapon for this area. But it’s not all straightforward. A new monster appears and begins wandering the path as you attempt to solve the puzzle. You can evade the monster, as he’s faceless and blind, tracking you by sound. He’s tough to beat, and if you do, he will just revive a short time later.
So yeah, now we’re being stalked by a brutish, blind monster with claws. Clearly the “f” is for “fun”.
Yeah, I can’t believe I said that either.

Still trusting him, ey? (Credit: NeoBards Entertainment, Konami)
After solving the puzzle, getting the key and running from the mist again to unlock the door, Hinako collapses from exhaustion. She awakens back in the real world (known as Fogworld in the journal) and has been found by Shu. No one appears to be left in town and there are monsters all around but Shu says it’s okay as long as they’re all together. He has a bat to protect himself with. He doesn’t seem terribly broken up about poor Sakuko, but he’s worried about the missing Rinko, so they decide to look for her at her house, which is at the outskirts of town.

He’s a big fella. (Credit: NeoBards Entertainment, Konami)
As you’re leaving town, you have a mini boss-fight of sorts where a hulking flower-covered beast with one knife arm and one tentacle arm attacks Hinako in a small enclosed area. (Looking at this monster, the “f” could conceivably stand for “fat flowered freak”.) This part kind of sucks. He’s too tough to fight outright (although it is possible to beat him), so the idea is to run around the area and give yourself enough time to crank the well handle three full rotations, fetch the key to the storage shed, and run past more doll monsters to climb out of the window.

Nothing bad can come of this. (Credit: NeoBards Entertainment, Konami)
After this, you have to cut through a very dangerous field and solve one of the worst puzzles in the game.
Looking at this environment, the “f” could be for “fog” or “field”. There’s certainly plenty of those around at this part of the game.
The scarecrow puzzle is horrible. The idea is to read a clue and remove a sharp object from one of the scarecrows. If you choose wrong, the scarecrow comes to life and tries to kill you. If you choose correctly, it will point to the correct path to proceed. If you walk too far in the wrong direction, the mist envelops you and directs you back to whatever area you’re currently at in the field. You have to do this five times. There are also random scarecrows around the field that will attack if you get too close. Sometimes decoy scarecrows wander in and hide among the ones for the puzzle. I found this puzzle annoying and non-intuitive.

Hinako, look out behind you! (Credit: NeoBards Entertainment, Konami)
After finally making it out of the field, you find Rinko holed up in her house. Her parents are missing, like everyone else in the village. She instantly proves herself to be clingy towards Shu and annoyingly jealous. She drops passive-aggressive comments to Hinako, who ignores them. She was really hard to deal with for this stretch of the game, acting catty and desperate for Shu’s attention. Of course the bridge is out (Silent Hill, remember?) so Shu suggests they take a roundabout route to escape, making their way to the highway behind his house. There’s a gate to the mountain by the middle school.
As they go to another room for supplies, Rinko seemingly pushes Hinako down the stairs, although we don’t actually see it happen, just her approaching from behind with a dead-eyed glare on her face. You also see some of the flowers growing on the stairs, so it makes you wonder if it was actually her or if she’s already corrupted.

Art appreciation. (Credit: NeoBards Entertainment, Konami)
The tumble down the stairs triggers your second visit to the Dark Shrine. In this part, Hinako has to catch up with Fox Mask by traversing structures on docks. Again the doll warns you, telling you to stay out of his room, but you have to enter it to proceed. Inside you find some disturbing art showing women with scratched-off faces and one that looks like Hinako without a head. There is also a note declaring that Hinako belongs to him and hinting that he wants to eat her. Yow.

The mighty naginata. (Credit: NeoBards Entertainment, Konami)
At one point you have to run from the red mist again and you lose your trusty lantern. But you find the super handy naginata which is strong and has great range. Also, like the knife, it is unbreakable. The only downside is that in tight quarters like hallways, you have to be careful that it doesn’t glance off the walls, making you miss your opponents. I had to keep switching between the knife and the naginata depending on how much room I had.

I’m sure this will go well. (Credit: NeoBards Entertainment, Konami)
As you continue, you keep hearing Sakuku’s voice. After finding the key to the door barring your way, you find yourself in the first proper boss fight of the game. Here you have to fight a Miko, a shrine maiden, who resembles the poor, departed Sakuko. The Miko has a huge spiked mace on a chain, various attacks, and an insane amount of health. (A health bar is not visible for her or any of the bosses, by the way.) She can grab you to eat your face off, strike from a distance (Mortal Kombat Scorpion style), and after taking enough damage, she starts charging up a powerful attack that you have to interrupt by hitting her.
And around this point I decided definitively that the “f” stands for “fucking hell”.

IT’S NOT GOING WELL. (Credit: NeoBards Entertainment, Konami)
This battle takes a lot of strategy and practice, but it was a lot of fun. You do get your first Blessed Hand Mirror just prior to the boss arena, so that does help, as long as you remember to equip it in one of your Omamori slots.
After Hinako defeats the boss, Fox Mask arrives and banishes the evil spirit. He refers to the Miko as an impurity within Hinako.

It was an “accident”. (Credit: NeoBards Entertainment, Konami)
Back in Fogworld, Hinako comes to. Rinko claims she fell down the stairs. Hinako agrees with this, but looks doubtful. The right sleeve of her uniform is now ripped off.

More town exploration. (Credit: NeoBards Entertainment, Konami)
The other two head off and it’s time to wander the town, looking for a way to get to the middle school and the path to Shu’s house. I’ll skip past a long portion of gameplay here, since it’s just exploring the town and the countryside. On the way you’re introduced to a new monster that appears to be a boy covered with doll heads. (There’s a female version of this monster also that first appears in the Dark Shrine’s second area.) All I’ll say is that there are a few cutscenes of Shu and Hinako being chummy and Rinko being a jealous, catty bitch. Hinako keeps interrupting some interesting conversations between the two of them. At one point Rinko says Shu is lying to himself and Hinako is dead and in a better place. Hmmm…

Time to wander the school. (Credit: NeoBards Entertainment, Konami)
At the middle school, you have to find the key to a locker that contains the key to the mountain pass. In order to do this, you need the key to the second floor of the school. Yeah, lots of keys. You have to visit the garden of the school, dodge (or fight) monsters, and solve a puzzle to find the key. Eventually more of those scarecrow kids appear in the halls and hanging from the ceiling.

This took dedication. (Credit: NeoBards Entertainment, Konami)
Also in the school are a couple of puzzles. You have to solve a puzzle box left to Shu by Rinko (showing more of her obsession with him) and decipher a code to open lockers. Eventually you get the key and reunite with your friends, who were just chilling in a classroom the whole time, the lazy bums. They insist you take a nap and you know what that means…

Creep. (Credit: NeoBards Entertainment, Konami)
Yep, more Dark Shrine adventures. This is a very lengthy segment. At one point in Fogworld you heard Hinako’s sister Junko saying that she has to say her goodbyes. That’s what this is all about— leaving her childhood friends behind one by one. You also need to find three keys to proceed deeper into the Shrine and there are three areas to explore to find these.

This is normal. (Credit: NeoBards Entertainment, Konami)
The first wing is Rinko’s section. You find her suspended in a cage over fire and have to find three pieces to the device that controls the cage. As you proceed through a revolving door puzzle (turning an orb to a color opens the doors that correspond to that color and close the opposite color doors) you uncover more of Rinko’s deep obsession with Shu and the jealousy of Hinako that has festered into a burning hatred. Her room is especially unsettling, the walls papered with sketches of Shu.

BURN. (Credit: NeoBards Entertainment, Konami)
Once you fit all the pieces into the device, you would think you’d lift your dear friend to safety right? Well, that’s what Rinko assumed. She was very, very wrong. RIP Rinko.
I think Rinko would consider the “f” as being for “fire”. Yikes.

Now for the second wing. (Credit: NeoBards Entertainment, Konami)
Anyway, as Rinko takes her fire-bath, the first key is earned. The second wing is all about Sakuko. There are more orbs to open and close the doors and this area also has usagi symbols over some of the rooms. These rooms have blue fire lanterns in them and if you kill an enemy within the light of those fires, they don’t get back up. You get more insight into Sakuko here. She writes letters to the rabbit at the school and is very clingy. She also has freak outs, is afraid of the dark, and thinks she can see spirits. She seems to preemptively hate Hinako because she believes Hinako looks down on her and pities her. She calls Hinako fake and suspects she will leave her eventually even though she promised to always be her friend.
At the end of this area you find Sakuko in a cage. There is a fairly simple puzzle here to turn statues and earn lampshades to plunge Sakuko into darkness. The girl begs and screams and Hinako coldly turns and walks away, leaving her in the dark. Another key down. Did any of Hinako’s friends like her?
Haha gross. (Credit: NeoBards Entertainment, Konami)
The third area is Shu’s wing. Good old, faithful and dependable Shu. He won’t have anything bad to say about Hinako, right? Well…
Shu’s area consists of a cozy room with little pillars that each hold one of his treasured possessions. These are all related to Hinako in some way and the unseen Shu talks in a creepy, breathless voice whenever you interact with one of the items. Two are missing and you have to seek them out. On this puzzle mode, the two I had to find were a crude drawing of Hinako with insults drawn around it and a comic book where she was drawn as the villain with her guts hanging out. How strange.

SLASH. (Credit: NeoBards Entertainment, Konami)
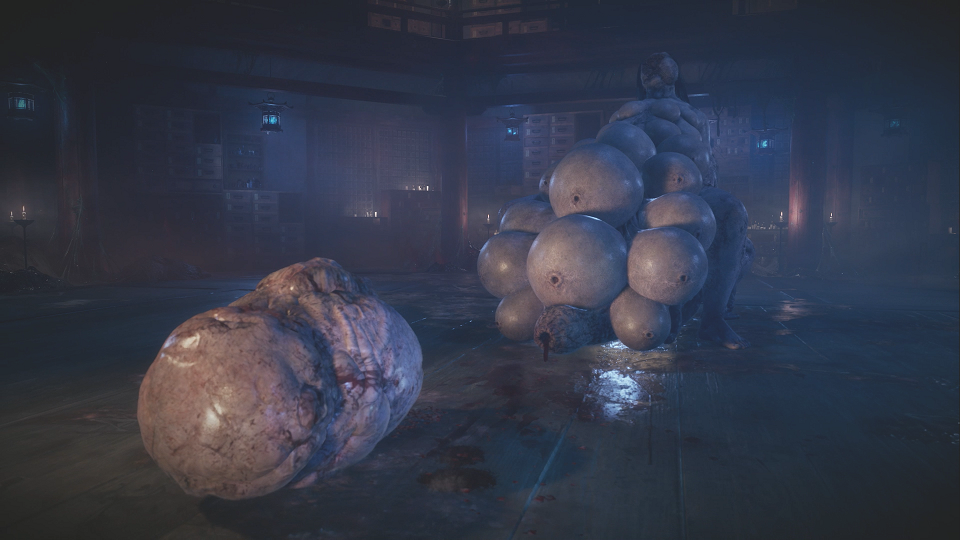
The most difficult part of this area is the miniboss, who is a perverse creature covered in what appear to be pregnant bellies. It resembles a woman lying on top of a man. From the woman side acid is spit out and the man side can claw at you if you get close. Occasionally pods are spit out that hatch doll creatures. It’s possible to kill the pods if you’re quick.

Shu’s just hanging out. Come on you knew I was gonna say it. (Credit: NeoBards Entertainment, Konami)
After getting back both of the possessions, you finally see why Shu’s voice was so creepy. He’s being suspended by chains with a manacle around his neck. He tells you that he’ll be fine with whatever you decide and you let him drop. After unlocking the final door, Fox Mask praises you for saying your goodbyes and Hinako says it had to be done.
After this you awaken in Fogworld again, Shu and Rinko are gone. Hinako isn’t sure if they abandoned her or went on ahead, so she heads off for Shu’s house. Right away the red flowers and mist appears along with monsters and she has to run along the mountain paths. This whole part of the game is pretty straightforward, exploring the mountain’s branching paths, fighting monsters and locating items, and occasionally running from the mist, which appears to have a fog creature in it.
One notable part is that at one point there’s an optional path where you find the Forgotten Shrine… an ancient tree that was once worshipped. It is said that treasure is buried at the roots of the Divine Tree. You can’t do anything with this on the first playthrough since it relates to the Sacred Sword side quest in New Game+.
After all this, you arrive at Shu’s house, where her friends are nowhere to be found. As soon as she enters the house she hears something outside and opens the door. The fog monster is there and grabs her with a monstrous white arm. It throws her to the ground and it’s Dark Shrine time again… but this is a different kind of visit. This is where you see what has to be the most jarring and shocking portion of the game.

Your new arm, m’lady. (Credit: NeoBards Entertainment, Konami)
The Dark Shrine this time is a maze of doors leading to three rituals presided over by Fox Mask and some silent fox maidens. Many doors are unable to be opened at the start and there are seals on some walls. After locating the first altar, we’re treated to a cut scene of a fox maiden presenting a box to Hinako. In the box is a severed fox arm. (It looks a lot like the arm that threw her to the ground.)

No, wait. (Credit: NeoBards Entertainment, Konami)
Hinako is made to remove her own arm with a saw (the right arm, corresponding with the torn sleeve) so it can be replaced with the fox arm. It looks very painful.

Yup, now she’s got a fox arm. (Credit: NeoBards Entertainment, Konami)
The fox arm is a permanent weapon that replaces both the knife and naginata but is only usable in the Dark Shrine. (Besides one exception later…) It’s slow but powerful. It comes with the skill Soul Siphon, which allows you to permanently kill downed enemies and recovers a bit of health. You can also open heavy doors, accessing more of the area.

The fox arm kicks ass. (Credit: NeoBards Entertainment, Konami)
The second ritual is no less grisly. Hinako is branded with the kudzu seal. This leaves a bloody scar on her back but gives her access to her Bestial Form, a temporary and very powerful transformation that makes the fox arm grow in size and strength. Killing enemies and Soul Siphoning them fills the kudzu seal that is now visible to the left of the other gauges. Enemies killed while in this form are dead for good. This seal also allows you to open doors marked with the same symbol in the Shrine.

Maybe this has gone too far. (Credit: NeoBards Entertainment, Konami)
This allows you to find the third, and possibly worst, ritual. In this one you get a fox mask. Doesn’t sound that bad? Well, to wear it, you have to have the top half of your face removed and the mask sewn on in its place. Owww.
Ohhhh. Maybe the “f” is for “face” because Hinako ain’t got one no more. (Sorry… too soon?)

Yeah, that mask is sewn on. (Credit: NeoBards Entertainment, Konami)
After this is done, Hinako starts to panic from the pain. Fox Mask, speaking authoritatively yet calmly, pacifies her. The Mask of the Fox Clan gives you the ability to see hidden things, which takes the form of melting those walls I mentioned earlier that have seals on them. One of these opens your path forward.
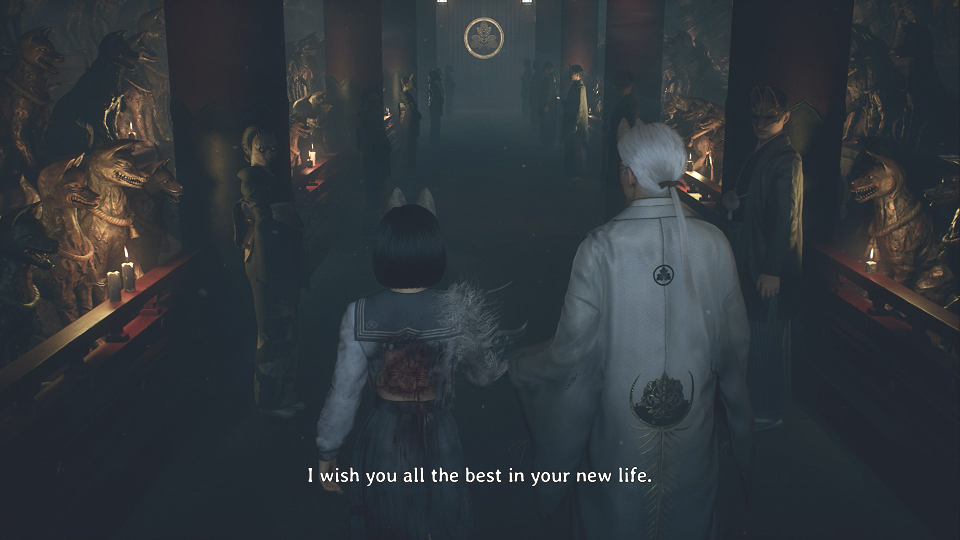
Walking down the aisle. (Credit: NeoBards Entertainment, Konami)
Hinako and Fox Mask walk along a long hallway lined with fox statues and guests in fox masks. (Although one has a bird mask… remember her for later.)

The next boss battle. (Credit: NeoBards Entertainment, Konami)
At the end of this hallway is a room with an altar and a priest with Rinko’s voice. This is the next major boss battle. You start this battle in Bestial Form and I managed to attain the form twice during the battle. Rinko has fire powers and can summon dolls to attack you. If you don’t beat them in time, she can set them on fire and they turn into bombs, rushing at you and exploding.

Yikes. (Credit: NeoBards Entertainment, Konami)
This was honestly an impressive fight. More challenging even than the Sakuko fight. It took a lot of dodging more than anything else and it was hard to keep an eye on Rinko and the dolls.
After defeating the Rinko priest, Hinako gets another headache. She has trouble remembering who she is and the doll appears to try and remind her. Fox Mask reassures her that she’s still herself. She decides that even if she’s no longer Shimizu Hinako, she’s still Hinako.

I guess don’t trust people in masks? (Credit: NeoBards Entertainment, Konami)
Hinako awakens outside Shu’s door. Note that Hinako’s arm is back to normal, her face and back unmarked. She has bruises on her and a couple of deep cuts on her arm, so she’s not unscathed. Also, the back of her uniform is now ripped out the way it was in the Dark Shrine. Her uniform is dirty, tattered and blood-soaked. The phone rings and it’s Hinako’s mom, calling her home for dinner. She can hear Shu screaming on the phone and telling someone to leave Rinko alone. Guess we’re going back home.
This is where the woman with the bird mask arrives and we learn it’s her sister Junko. Junko asks how long she’s going to stay here, time is running out. She says that Hinako still seems like a little girl and she’s lost. She says she must decide her future. Junko seems cold and severe, and Hinako says she doesn’t seem like herself, though Junko assures her she’s normal. She says “No matter what anyone else says, the decision is yours and yours alone. Just remember one thing, you can’t think about it forever. You’re running out of time to choose.” With that, Junko walks off.

The plot thickens… (Credit: NeoBards Entertainment, Konami)
This next section involves going down a side mountain path to find your way back home. The village is being overrun by flowers and piles of flesh. On the way there is a new(ish) monster type— a big bloated thing that looks and acts almost identical to the pregnant miniboss, but this one appears to be covered with cysts instead. Some of the pods it spits out are gray and explode on contact.
Although the town is being overrun, the park is clear, which is super creepy. Upon entering it, Hinako has a flashback of an event she doesn’t remember. A young boy named Kotoyuki is bitten by a fox. Hinako calms the fox, saying he’s just scared. She helps stop the bleeding and had called for adults. Angry, they kill the fox. He and Hinako become friends, but he moves away soon after. We find several letters from his mother to him talking about his noble blood and how he has to take care how he appears and who he socializes with. (Meaning Hinako.) It was discovered he was from a noble family line. His true last name is Tsuneki, and his family is said to be destined to bring good fortune to a disordered world. (Why is his mother writing him letters? *shrug*)
Oh, also note that “Tsuneki” is an anagram for “kitsune”, the word for fox. (I began to wonder is maybe he was Fox Mask.)

Hinako is finally home. (Credit: NeoBards Entertainment, Konami)
Hinako’s house is way bigger than it should be. The goal here is to solve some puzzles to unlock the door that Shu and Rinko are behind. There is a scale puzzle where you have to balance dolls. There’s an easy puzzle with photographs on the wall. There are four crests and a riddle. There are calendars that have to be hung on the way to grant access to other locations in other time periods. There are three sections of the house in all.
We learn a lot of backstory here and it honestly recontextualizes a lot of the game. In some places memories trigger where we see that her father is an abusive alcoholic with anger issues who once threw a knife at her. He was a cook but lost the family’s money and his restaurant in bad investments. To pay off his debts, he agreed to an arranged marriage for Hinako. This puts a lot of the previous dialogue and symbolism into perspective, including Shu and Junko’s references to a choice and the imagery of the wedding guests, altar, and priest in the Dark Shrine.
We also learn that Hinako used to play with small wooden dolls as a child and that she seemed to believe there was a second Hinako and that she had to share the dolls with her. In one particularly creepy area of the house, wooden dolls litter the halls and a room looking like discarded beer bottles. In the room is a large, cracked doll with one realistic yellow eye that follows you as you move. You can’t do anything with this and if you interact with it, all Hinako says it “I should get out of here.“

Now there’s two Hinakos. (Credit: NeoBards Entertainment, Konami)
Near the end of the house section, one of the memories becomes real. Her mother tells her that Shu is there to see her and she asks her mom to lie and say she’s not home. This memory Hinako turns and realizes that the real Hinako can see her. They have a brief conversation where Dark Hinako tells her that she could have killed Hinako at any time, but they have to face each other as equals. She says Light Hinako is not taking it seriously and keeps running away. She says she will kill her, mom, dad, her friends, and the whole town, ending with Shu. She also mocks her that Shu doesn’t see her as a woman. Also, in one iteration of her room, you find a perfumed letter that says it’s from “a man” that seems to have romantic implications. Was an adult creeping on teenage Hinako?
Finally getting to the final door, Hinako finds her three friends hanging from the ceiling, dead and bled out. Rinko is burned like she was in the Dark Shrine. Hinako crosses into another room and finds a celebration. Her father is drinking and there are sounds of an unseen party around them. On the table is a grisly feast of rotten and fly-infested food. Her parents are happy and greet her. Her mother hands him a knife and he stands, drunkenly announcing that he’s a master with the blade. The crowd cheers him on. Hinako panics, having a flashback to when he threw the knife at her.

Meet mom and dad. (Credit: NeoBards Entertainment, Konami)
Her parents transform into twisted monsters and become the next boss battle. Dad becomes a huge mass of flowers and teeth that resembles the flower hulk from earlier. One arm is a tentacle that can grab you and the other arm is his trusty knife. He has a shouting attack that can stun you. Mother is also covered in flowers, her eyes covered by them like a blindfold. If you look closely, you can see she’s been hollowed out. She has a kitchen knife and either slashes at you or throws it. She can grab you and throw you in your father’s path. Throughout the fight she demands you apologize to your father. He hurls sexist insults at you, calling you a disappointment and voicing his anger at being disrespected. Women should know their place, he says.
You may be thinking about now that the “f” is for “family forgiveness”! Yeah, no. You have to kill them. Big time.

Bye mom and dad. (Credit: NeoBards Entertainment, Konami)
When I played, I focused on Mother first, taking her out before fighting Father. (There’s a trophy for beating him first, so I’ll have to try that on one of my future playthroughs.) After defeating them, they stagger from the room, shedding their goopy monster skin in a slime trail behind them. Outside they’re picked up by a wraith wearing a bridal kimono. She has a fox arm and is clearly the fog monster. This is the Shiromuku. She kills them and Hinako screams, having another of her headaches.

More Dark Shrine. (Credit: NeoBards Entertainment, Konami)
Hinako is back in the Dark Shrine with her fox upgrades. Fox Mask gives her a brooch, saying it’s proof that she’s his. In this area you have to wander in three maze-like areas looking for more crests to fit into a mural. If you enter the wrong door, you’re locked into monster battles and can’t leave until you defeat them all. Making it even more difficult, there is no map for this area. It took me until the second playthrough to figure this out, but the secret is to follow the glowing eyes of the fox statues to the right door. The correct door also has monsters, but the fight rewards you with one of the three crests.
I forgot to get any screenshots of the mural, but it’s not that important. This was the most annoying puzzle in the game for me, even more so than the scarecrow one. The puzzle is very vague and you have to slot the crests into the right places on the mural. At least on Puzzle Hard mode, it was not intuitive and took a lot of trial and error. Also in this area is a new monster who looks like the flower hulk but instead of a knife hand it has a taiko drum and can summon dolls to fight you. I always go beast mode on this guy.
After getting the third crest, Junko arrives again and asks for a word alone with you. She asks “It’s still alive, isn’t it?” Hinako says yes. Junko tells her to stop being childish and kill it. It can’t exist like this. Hmm… odd. After solving the mural puzzle, Fox Mask presents Hinako with a box that matches one he is holding. Inside them are rings that they have to exchange and slot into a statue of a black fox and a white fox. This is the final rite. As the big doors open, Hinako awakens back in Fogworld.

The gauntlet begins. (Credit: NeoBards Entertainment, Konami)
She’s surrounded by flowers and blood and is enraged at what’s happened to her parents and friends. She goes after the Fog Monster, looking for revenge. This is a serious guantlet back down into the town, fighting monsters as you go. There’s a lot of weapons along the way and the monsters go down fairly easy, but if you’re careless they can get the better of you. It’s also difficult to skip any of the battles as the path has become very linear.
And now I think the “f” may stand for “fuck-ton of fighting”. Is that too much of a stretch? Then maybe just “frustrating”.
The only thing I really need to mention here is that on a signboard you can find a missing poster for Hinako, saying she was last seen wearing her navy school uniform and in the company of a man.

The fox bride. (Credit: NeoBards Entertainment, Konami)
At the end of the rampage, you come face to… er… you confront the Shiromuku. She grabs you by the neck and Junko arrives to says she’s being very rude. Rather than tell her to let you go, she tells the wraith to kill Hinako. She snaps the girl’s neck and we’re back in the Dark Shrine. Hinako and Fox Mask approach the Inari altar and are given ceremonial objects by the fox maidens. These look like they’re made of antlers, twine, and flowers. After they set these on the altar, flowers start growing all over Hinako. The fox mask falls off and she transforms into the Shiromuku. We flash back to the town, where the fallen Hinako crumbles into dust and the Shiromuku walks by, flowers growing in her path.

Uh… sure, Hinaka. (Credit: NeoBards Entertainment, Konami)
Now Dark Hinako is in Fogworld, heading back along the rampage route headed for home. She’s back in the form she takes in Dark Shrine, with the fox mask, kudzu seal, and fox arm. The town is fully transformed now, and Dark Hinako feels like the world is celebrating her. At various places during this trip, you run into the doll who warns you to turn back and triggers monster battles. The final battle of this path is one of the toughest non-boss battles of the game, consisting of multiple waves of enemies and ending with a taiko drum beast. One wave has two of the faceless beasts at once.

Hey, I thought they were already dead? (Credit: NeoBards Entertainment, Konami)
Once she arrives back home, her parents are waiting for her and she transforms back into the Shiromuku. Her mother is proud and beaming and her father is crying, saying that it’s not her home anymore. Even if she comes back alone, he won’t welcome her inside. She lifts them up silently, crushing their heads.

Nearly at the end now. (Credit: NeoBards Entertainment, Konami)
Light Hinako is now in the Dark Shrine and makes her way through the same areas from earlier in the game, in an abbreviated and straight-forward path. There’s a few battles here, but they’re thankfully pretty easy. (I was seriously battled-out by this point.) At the end of this path is the final Hokora next to big double doors. Through the doors is a cut scene and the final boss battle.

Take all the drugs, kids. Then you’ll be cool. (Credit: NeoBards Entertainment, Konami)
Inside this room is the Inari altar where the antler offerings were laid. Junko is there and is amazed Hinako is still alive. Her tone shifts a little here from the cold, detached Junko we’ve seen so far. She tells Hinako to calm down and asks her if she remembers why she’s here. Hinako is panicking and takes more red capsules. Junko asks what they are and how long she’s been taking them. Junko tries to stop her and the pills spill onto the floor. Hinako shoves her away and tries to destroy the altar with her pipe. She turns and the Shiromuku is standing there. She demands the creature give her back everything it took— her family, her friends, her self. The final boss fight begins.

Stab you with flowers. (Credit: NeoBards Entertainment, Konami)
The Shiromuku is fast and strong, but the fight (at least on Story Mode) was surprisingly easy. She has many attacks, including lunging with her fox arm, wide swings, and teleporting around the arena. She can also grab you, hurting you with the flower infection. She can spread the flowers around, making you run away.

The final boss. (Credit: NeoBards Entertainment, Konami)
I did well in this fight because I saved my strongest weapons and had stockpiled first aid kits and toolkits. After doing enough damage, you stun her, which starts the next phase of the fight.
There is a mechanic in this fight where if you die, you will resurrect twice. The second time you have an unbreakable pipe as your only weapon, your health recovers on its own, and your stamina does not go down. You also have 99 red capsules to heal yourself with. I did not know this until I saw it happen to a streamer I was watching— in my fight, I didn’t fall once. I didn’t even use my hand mirror— I still had it in New Game+! I got a trophy for beating her without falling.

Is this symbolism? (Credit: NeoBards Entertainment, Konami)
After toppling the Shiromuku, Hinako is still panicking and starts running, trying to escape the Dark Shrine. Red Capsules are everywhere and can be picked up. There are doll monsters everywhere and the fox statues are crumbling. Rather than fight, you have to run forward. At times Hinako slows down and holds her head and the scene changes to other locations like the town and her house. You hear unseen people asking what she’s doing and if she’s insane. You also hear Rinko saying she’ll never forgive you and Shu apologizing. After running far enough, Hinako finds herself in a long hallway filled with giant capsules. There are open doors at the far end with red light shining through.

The end of the road. (Credit: NeoBards Entertainment, Konami)
She pushes through the doors and is outside the Shrine on a bridge. There is fog all around and rotating red lights and sirens. The Shiromuku is blocking her way and she screams at it to get away. It cuts to black and the ending credits play.

Whoa. (Credit: NeoBards Entertainment, Konami)
There is a brief mid credit scene showing a black screen with sirens blaring. A policeman says there are two male victims, the same female suspect as the wedding massacre on Route 8. The knife used hasn’t been found, so the suspect should be considered armed. We see a dark street with blood pooling on it. The camera slowly pans up to show an evidence marker and Hinako’s bent and bloody pipe. The suspect, they say, is in her twenties and wearing a wedding dress, last seen fleeing the Tsureyoshi Shrine. Evidence marker 2 appears to be an organ of some kind— a heart? Marker 3 is Hinako’s pill case. Another cop reports that the suspect was seen taking some unidentified red and white capsules, which match the ones found at the wedding venue. With this, the credits continue and the game ends.
So what did that mean? Well, we now know that Hinako is not really a teenager, but a grown woman addicted to drugs. The conversation with Junko just before the final boss fight was actually the real world spilling through— her real-life sister asking her what she was taking and if she should be taking that much of it. During the final run through the game’s environments, you hear people from the outside world calling her crazy and asking what she’s doing. The battle against the Shiromuku is Hinako going crazy at her own wedding and killing an unknown number of people before running off. Seeing the wraith outside is her lashing out and killing two men on the street. Where Hinako is now and if she’s caught remains to be seen.

New Game+ (Credit: NeoBards Entertainment, Konami)
After winning the game, New Game+ is unlocked. Previous Silent Hill games have had New Game+ (also known as “Next Fear” in the first game), but it was always a method for adding additional items and weapons and giving you access to more endings. That is the case here too, but it’s even more vital than that this time. In New Game+ in this game, new layers are added to the story, additional content is available, and the cutscenes and dialogue change in many ways. While the first playthrough only gives you access to the first ending, there are four more available in New Game+ that expand upon the story and give further insights into Hinako’s journey. There is also a New Game++ after getting two additional endings.
Learning this, I’ve never been more eager to play through a game a second time. I started my second playthrough the night after completing my first. This time I wore the white uniform and selected Action: Hard, Puzzle: Story. As for how that went and what I learned in my second playthrough, well, that’s a story for another day. (I got done soon enough to play a quick third run for the UFO ending. Yes, there’s a UFO ending. And it’s awesome.)

So much fighting. (Credit: NeoBards Entertainment, Konami)
There’s a lot to unpack with the story here. At its core, it’s a story about self-discovery, finding your strength, accepting your place in life or fighting against it, saying goodbye to your childhood. But there are elements of spirituality, tradition, societal gender roles, abuse, bullying, alcoholism, drug abuse, and losing yourself in the role you’re expected to play. Hinako— as we now know, an adult woman— is trapped in her childhood village, clinging to friendships that may not have been what she thought they were, struggling against the choices made for her. Part of her runs from these choices, the other part of her faces them.
There is a lot of symbolism in this game, as is usual for a Silent Hill game, but much of it is in your face and fairly easy to parse. The forms the monsters take, the doll showing up as a symbol of childhood warning her against bad decisions. (The fact that you cannot heed the doll’s warnings is pretty telling, too.)
In Fogworld, Hinako spends her time running from the danger, just trying to survive. In the Dark Shrine, she runs towards the danger and pain, facing it stoically and as a duty. (After the first ritual she refuses to take the piece of wood to bite down on and declines offers to rest.) Everything in the Dark Shrine is internal to Hinako… her friends are how she perceives them, the bosses reflecting her negative feelings about them and their diaries reflecting how Hinako believes they feel. (Sakuko wielding her faith as a weapon, Rinko burning everything with her jealousy and anger.) The rituals reflect her feelings that marriage will change her, alter her into something dark and twisted, using her pain to lash out at any threat, but ultimately relying on Fox Mask, her husband, to guide her and tell her what to do and where to go. She has given him everything, including her right arm and her face. Her struggles with her identity tie into this, when she decides even if she’s not Shimizu Hinako, she will still be Hinako. (Losing her family name to marriage.)
The Dark Shrine is all about symbolism and Hinako’s spiritual search for strength. Did her friends really think those terrible things about her? Or is that just how Hinako assumed they felt? It’s hard to say, but Shu making fun of her in his drawings seemed really out of character for him. Was that Hinako’s way of justifying letting him drop like the others?
That said, it’s not all symbolism… the village is shown to be very traditional, superstitious. There are a lot of lore and legends to be found as you explore. The people of Ebisugaoka hold to the old ways. A malevolent force would use that against them. (Much like the demon Samael did with the cult in the first Silent Hill.) Depending on how you look at it, Inari-sama could really be the fox god, or it could be another demon. The Dark Shrine could be a literal place, or a place inside Hinako. Or both… I mean, we do read documents talking about others finding themselves there… other women being taken for fox weddings. Stories get handed down, change over time, influence other people’s perspectives… maybe Hinako heard these stories enough that they became entangled with her own problems in her drug-clouded mind. Her impending wedding could have easily become a tortuous trip through another world. One that both does and doesn’t exist in reality. So is Fox Mask actually Inari-sama? And what about Junko and her bird mask? Was she chosen by a different god?

The monsters are designed so well. (Credit: NeoBards Entertainment, Konami)
The monsters, as is usually the case in Silent Hill, relate to Hinako’s fears and trauma. The dolls are all stitched together and posing, relating to how she sees women as being reshaped into men’s images, playing their roles without agency. The faceless hulking monster represents men preying on girls— the journal mentions that they are perverse and only attack women. The giant pregnant monster relates to her fear that she will become nothing more than a baby-maker. The giant flower-covered creature with the knife relates to her father, the same with the taiko drum creature. (They closely resemble the father boss.) The drum monster has tendrils connecting the doll monsters to it, using them as puppets the way Hinako sees her mother controlled by her father.
The bosses follow these kinds of themes. Sakuko/Miko uses its faith as a weapon. The Rinko Entity uses the flame of passion. The parent fight shows their dynamic, with the father shouting and trying to petrify her with his words and insults and the mother assisting by throwing you into his path. The mother boss was blindfolded and hollowed out, having lost vital parts of herself in her marriage and subservience to her husband.

The hell? (Credit: NeoBards Entertainment, Konami)
The story gradually unfolds as you go. Things that didn’t make sense at the beginning of the game make more sense later on… such as Sakuko calling Hinako a “traitor”. Reading through her diaries in the Dark Shrine indicates that Hinako once promised she would always be there for her. The arranged marriage and leaving the village would seem like a betrayal to Hinako’s shy, timid friend. Now, what’s with Rinko saying Hinako is dead? We never got a clear reasoning for that. The only thing I can think of is that leaving the village is seen as being symbolically dead to those you leave behind.
Another theory I have is that maybe Hinako ran away instead of going through with the arranged marriage. Late in the game you find her missing poster stating that Hinako was last seen in the company of a man and wearing her uniform. This would also make sense as to why her father was fighting back tears and saying she’s not welcome back at home. If she didn’t go through with the arranged marriage, that would shame the family. Not to mention the fact that her father already paid off his debts with the money.
Keep in mind this is all speculation, and the things I’ve mentioned may not even have been literal but symbolic. Later playthroughs add more context to the story, from what I’ve seen. So maybe we’ll get more insight into this later.

Discarded pills. (Credit: NeoBards Entertainment, Konami)
So that’s how I see the game’s plot and symbolism, but what was up with that abrupt and jarring ending? That threw a wrench into everything, right? According to that ending, all this was in Hinako’s head while she was hopped up on red capsules. She’s not a teenager, she’s in her twenties, and killed an unknown number of people at her wedding and continued her killing spree as she fled from it. Or is the ending just more of the delusion? A possible conclusion to her story that her drug-addled mind is hallucinating? At this point we don’t know what to believe, the twist ending pulling the foundation of the game out from under us.
Since this is Silent Hill, I can guarantee we won’t be handed all the answers, and much of this will be left to individual interpretation. We will have to come up with our own theories on what actually happened and what was symbolic. Are there really two Hinakos? Is her dual nature more symbolic of two facets of her personality? Does she have multiple personalities or schizophrenia? Did Shu know what the red capsules were doing to her and did he really resent her like his prized possessions suggested? What happened to the new doctor who disappeared? Who, exactly, is this Kotoyuki we learned about? Is Inari-sama real or a manifestation? Why does Junko wear a bird mask? What did she want Hinako to kill? Why did Rinko say Hinako was dead and why was there a missing poster for her? Who was the man who was writing to her? Is there any significance to the big wooden doll? We’re left with many questions. Not to mention having to figure out what of the lore is actually related to the story and what is flavor, as with any Silent Hill game.

So cool. (Credit: NeoBards Entertainment, Konami)
So is there more to Hinako’s story? Just what is going on? Well, as mentioned, New Game+ adds more layers to the story, and there are still four more endings to experience. This is why for the first time ever I decided to make my annual Silent Hill post a two-parter! Yes, sometime next year, I will be playing through Silent Hill f two more times to get the other two endings, and I will write about my second and third playthroughs and all the endings in Part 2 so we can do some further plot analysis. I didn’t want to try and squeeze it all in right away, but you won’t have to wait for next Halloween to see the continuation of this post. (Besides, this post was long enough without extending it further.)
The one thing we didn’t figure out— despite my amusing running bit— was what the “f” stands for. Several people have said that it could refer to “flower” or “feminine”, both of which make sense. “Faith” and “fox” are also pretty likely. A common theory online is “forte” due to the italicized stylization of the “f”. (It’s not exactly the forte symbol, but close.) This is a musical term meaning “loud” or “strong”. Loud doesn’t make much sense in the context of the plot, but strong would certainly fit. And Hinako was more into track than music in school. But still, the juxtaposition of “silent” and “loud” is pretty cool and reflects Hinako’s dual nature and internal struggles.
Some bandy around “five” saying that this is the fifth main installment… but that’s utter nonsense. Sure, if you ignore “Homecoming” and “Downpour”. (Shattered Memories and Origins are arguably mainline games too, although I would consider S.M. to be a side game since it’s a reboot of sorts. I think Origins is technically Silent Hill 0, though.) Depending on how you look at it, this would be either the seventh main title, or another side game. Regardless, whether you like Homecoming or hate it, you can’t ignore that it is officially Silent Hill 5. (That was its working title during development.) It could be “five” if it refers to the five different endings, but that doesn’t seem very likely to me. If you need for it to stand for something number-related, it could be “first”, since this game takes place chronologically before any of the others.
Ultimately, I think the answer is more simple. After spending too long thinking it over, I think it either means “flower” or it means nothing. (Literally meaning nothing specific.) Flower refers to the blood lilies that spread throughout the game, infecting the town, Hinako, Sakuko, and several monsters. It could also relate to Hinako herself, as a flower that will either thrive or wilt depending on her choices. Flowers are often associated with girls or young women. If we go with the nothing option, then it’s just nonsense to get people speculating and talking about what the meaning could be, which would be very Silent Hill of this game. I think either are pretty good options, but it’s up to each of you to find your own answer. (As long as that answer is not “five” because no amount of mental gymnastics can make this the fifth game.)

Beautiful. (Credit: NeoBards Entertainment, Konami)
But that’s quite enough of my wild over-analysis of one letter in the title. (The ambiguity angle seems pretty likely now, doesn’t it? Worked on me.) Anyway, I clearly loved this game. The amazing story, the setting, the new mechanics, and the overall experience were all excellent. While the combat could have been better, and the monsters more varied, I still think this game excelled at what it set out to do, which was bring the creepy Silent Hill motif back to its Japanese horror roots.
As a horror game, this one works on multiple levels. There are the more overt jump scares (the game delights in having monsters jump out at you), the more subtle creepiness (like the bloody bathtub, the cracked father-doll, etc.), and more overt horror like Hinako’s mutilation rituals and the boss battles. There are the psychological elements throughout, the ghostly specter of the doll whose warnings you cannot heed, and the pervasive fear of the unknown all around you as you play through the story. The helplessness of seeing Hinako on her path to becoming the Shiromuku is pretty horrifying as well.
So as a horror game it works quite well. The combat system had its positives and negatives. I liked the upgrading system, but at times the sanity meter and focus mechanics seemed less important than the stamina and health. I tried to use focus, but never really found it useful. I liked the variety and strategy involved with the Omamori. The strict inventory space and the weapon durability limited you in frustrating ways, but I suppose that added to the game as well. You had to balance your attacking and evasion to preserve your weapons and balance out which items you kept versus which you enshrined.
I’ve heard a lot of complaints about the combat mechanics, but I mostly liked that aspect of the game. Sometimes it felt clunky and slow, at other times it was smooth and satisfying. The number of enemies— especially at higher difficulties— can be oppressive. With the importance the game put on combat, it feels like there should have been more options. But from a design standpoint, that likely would have hurt gameplay. There are only so many buttons on a controller and adding more combat options would have required button combos, which I think would have made combat more difficult. I do feel like focus was underutilized. I didn’t use it at all in my first playthrough and on the second I abandoned it fairly quickly. Charging up leaves you far too open to attack. I did find it very satisfying to get off a perfect dodge or a counter, and to stun enemies. While the fox arm is slower, I liked combat much more using that, especially when it came to beast mode.

There was so much haunting imagery in this game. (Credit: NeoBards Entertainment, Konami)
Adding more content in further playthrough was an awesome touch. The multiple endings and added dialogue and documents really incentives replays. Boss fights were well done with a lot of strategy and new patterns to learn. I love upgrading characters in games, so I really enjoyed the Faith system. I do feel like more could have been done with it, though. Improving offense and defense, upgrading dodge and counter chance… There were a lot of possibilities. I really hated the inventory limit, but it was nice to be able to upgrade that and different items stacking differently did add to strategy. You can’t necessarily horde items and you have to decide what to use and what to leave behind or offer at the Hokoras. There were still far too many times that I ran out of space and had to spend a lot of time running back and forth to Hokoras to offer items. The Omamori system adds several dimensions of strategy to gameplay, with all the different options, the limit to how many you can equip, the combinations and interactions between them… it all adds a lot to the game.
The spooky factor, the tension, the genuine exhaustion after facing waves of enemies… although that was a bit much by the end. There were too many unskippable enemies and the game became a bit too combat-heavy as it approached the endgame. I feel like it could have used more puzzles and more opportunities to stealth and evade enemies like there was in the beginning of the game. Some of the puzzles were solid, others did not have nearly enough information and context to solve, depending on the difficulty and the ending you were going for. Still, the variety of puzzle solutions and how they change depending on what mode or ending you play was a nice touch, keeping things fresh.
Overall, this was a very strong game. The story was deep and engaging. The music is fantastic. The graphics are incredible. The mechanics and pacing have their ups and downs but altogether I think they worked. The voicework was fantastic, but I do prefer the Japanese audio over the American dub, but that’s just my preference. I love the monster design and the different environments are so detailed and feel real.
With all that said, where would I rank this among the other Silent Hill games? After considering this carefully, I would say that it steals the number two slot for the whole franchise. Silent Hill 3 is finally dethroned, dropping one rank. Of course, Silent Hill 2 and SH2 Remake are tied for first place and I can’t imagine any situation that would ever knock them down from the top spot. (Yes, Konami, that is a challenge. Show me a better Silent Hill game and I will admit I was wrong.) Still, even at second place, this game is incredible, really standing out for its graphics, traditional setting, monster designs, and replayability. Above all, it will remain memorable for the deep and layered story that keeps you thinking about it and speculating long after the ending credits roll.

I love this shot. (Credit: NeoBards Entertainment, Konami)
Thank you for joining me once again on our annual trip to Silent Hill. As mentioned, there will be a Part 2 to this post coming up sometime before next Halloween. (Any more analysis and how this game relates to the series as a whole will be in Part 2 as well.) What will I do next year? Unless something unexpected happens, I plan to (finally) play Silent Hill Origins, the game I have been intending to play for two years now. (Last year Silent Hill 2 Remake came out, and I couldn’t help but to play it right away.) Anyway, thanks again. I appreciate you all, and I’ll see you soon to continue Hinako’s journey!

Uh, thanks doll. We figured that out. (Credit: NeoBards Entertainment, Konami)